Lots of Hearts Cardigan
This short sleeve cardigan is made using separate squares, then joining together. The squares can be used to make lots of other different items, including cushions and blankets.
Materials
Dk / weight 3 yarn. For my example, I made size 1-2 years. I used a variety of colours for the squares.
3.5mm and 4mm crochet hooks
Written in English US terms with abbreviations for UK
sc = single crochet (double crochet in UK)
slst = slip stitch
blo = back loop only (crochet into the back loop of the stitch
[ ] = in the same stitch
* * = repeat between
ch = chain
Gauge
With a 4mm crochet hook
18 sc x 20 rows = 4”
Pattern notes
This pattern starts with making the required squares. The following size charts show the layout below and how many squares to make for each layout depending on what you want your finished sizes to be.
The ch1 does not count as a stitch.
Each size tells you what size square to make.
This pattern is based on dk weight yarn but any weight can be used, you will just need to make a bigger or smaller square. Play around to get it the right size in the chart.
They can be joined together how you want. I used this zigzag slst join VIDEO when working along the sides of rows 1 row = 1 slst.
The yarn amounts are only approximate.
Sizes and Layout
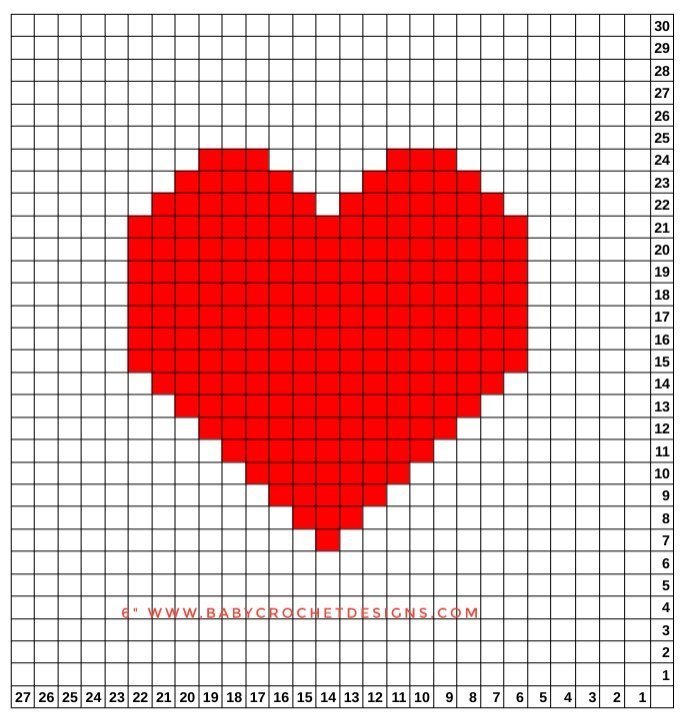
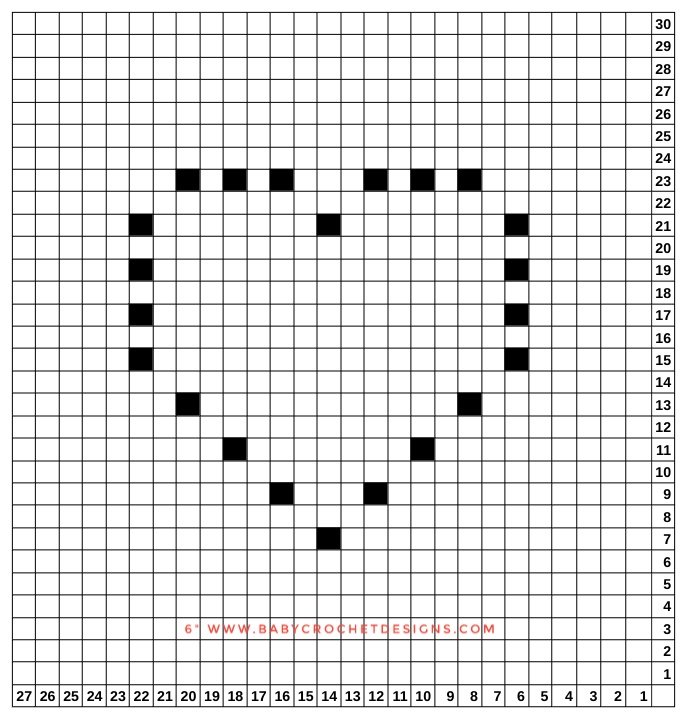
I have made the below charts for plain hearts and bobble hearts. This is what they look like worked up.
Plain Hearts
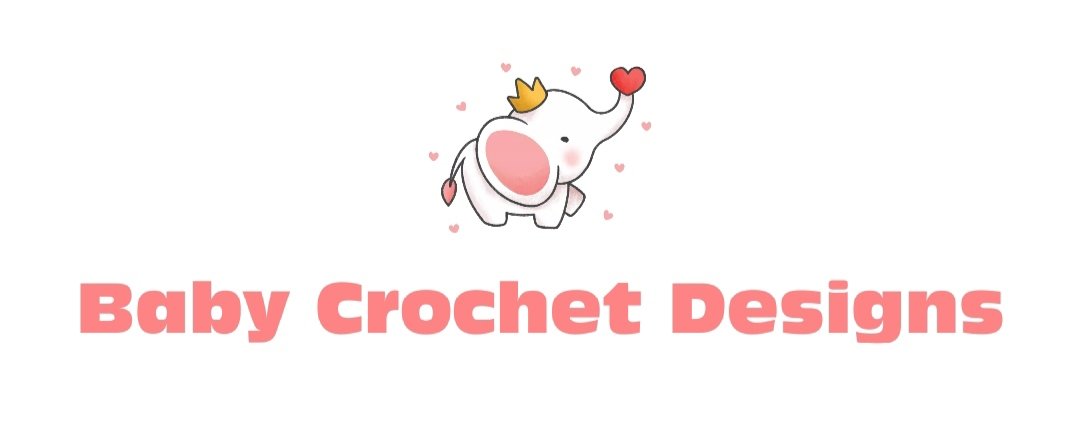
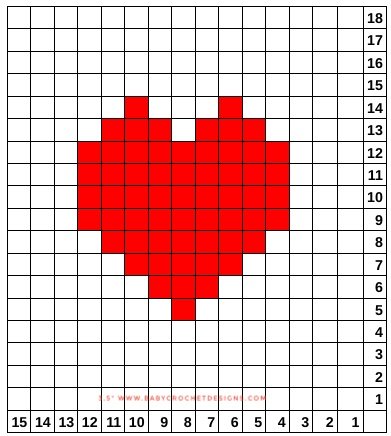
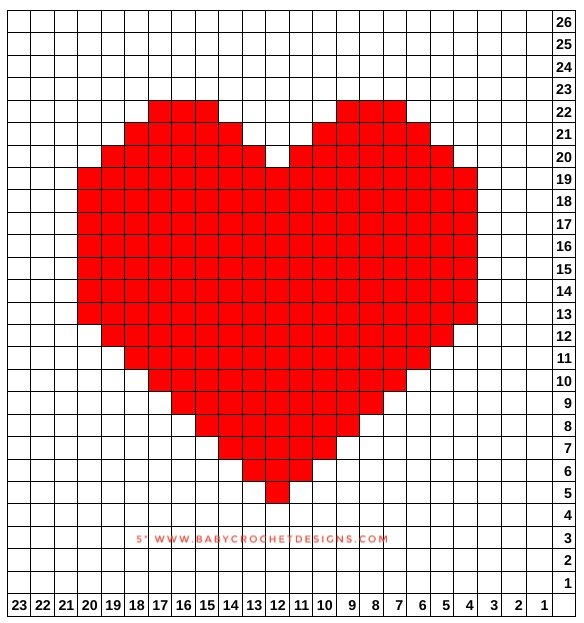
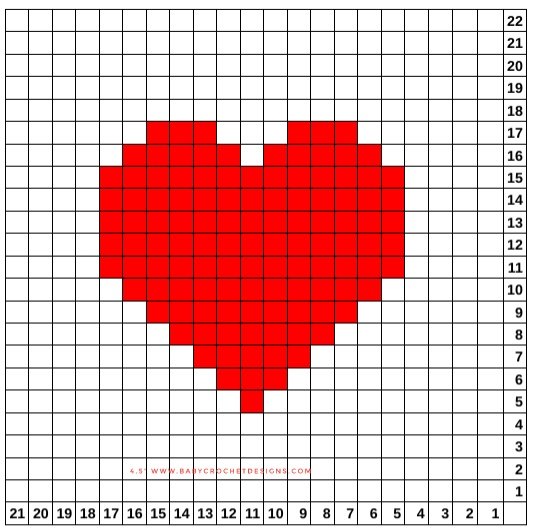
These are made by simply chaining the amount of stitches on the chart + 1. Then sc in the second chain, sc all. Then ch1 to start the next row. Make the required rows on the chart. Use your main colour for the white, and your chosen heart colour for the red. Video for changing colour here
3.5”
5”
4”
5.5”
4.5”
6”
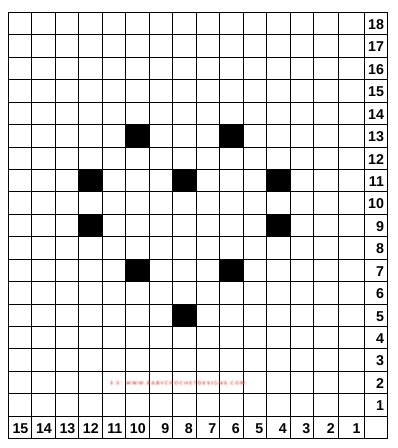
Bobble Hearts
These are made by simply chaining the amount of stitches on the chart + 1. Then sc in the second chain, sc all. Then ch1 to start the next row. Make the required rows on the chart. Use your main colour for the white, and your chosen heart colour for the bobbles (marked in black on the chart). Video for changing colour and bobbles here
3.5”
5”
4”
5.5”
4.5”
6”
6”
Once you have made the required squares and decided your layout, they can be joined together how you want. I used this zigzag slst join VIDEO when working along the sides of rows 1 row = 1 slst.
I would recommend leaving the required armhole depth as stated on the size chart.
I made mine without sleeves, but you could easily adapt to crochet the sleeves from the armhole, or make slightly bigger squares for the sleeves.
I did the below edging on mine.
Bottom edging
If you want the edging less than 1.5” chain less stitches to begin, or more, chain more.
Using a 3.5mm hook
With work upside down, join yarn at the bottom right
Row 1: ch9, sc in second ch from hook, sc 7, slst 2 stitches of the bottom edge. (8) Turn
Row 2: (in blo) ch1, sc all. (8) Turn
Row 3: (in blo) ch1, sc 8, slst 2 stitches of the bottom edge. (8) Turn
Repeat rows 2 and 3 until you reach the other side, then continue to the button band.
Button band
I didn’t put buttons on mine, if you want buttons, make button holes on row 3
(to make button holes: ch1, skip 1)
Using a 3.5mm hook
(working your way up around the collar and back down to the other side).
Row 1: ch1, sc all. Turn
Row 2-7: (in blo) ch1, sc all. Turn
Fasten off.
Armholes
I did a round of sc around the armholes, then the next round I did 3 dc in each stitch to make the ruffles.
I would love to see your makes feel free to share #lotsofheartscardigan @babycrochetdesigns Instagram, Pinterest and Facebook.
*COPYRIGHT © 2025 This pattern is made for personal use only. My patterns may not be used in any tutorials. You may not copy, share or sell this pattern, or use any of my photos. You may make and sell items made from my patterns in moderation but please be kind and credit me in any of your photos or listings @BabyCrochetDesigns as the designer many thanks*
